February 2012 | Coding Cluster - using asp.net, c#, mvc 4, iphone, php, ios, javascript, in asp.net mvc 3 & more
 

How to backup MySQL database? - using mysqldump in command line

Wednesday

How to take complete backup of mysql database using mysqldump:
                                                        MySQL provide a great command line utility to take backup of your MySQL database and restore it. mysqldump command line utility is available with MySQL installation

Code:
mysqldump –u[user name] –p[password] [database name] > [dump file name]

Example:
mysqldump –uroot –p db_codingcluster > codingcluster.sql

Backup multiple databases in MySQL.
mysqldump –u[user name] –p[password] [database name 1] [database name 2] .. > [dump file name]

Example:
mysqldump –-user root –-p db_first db_second db_third > db_codingcluster.sql

Backup all databases in MySQL.
mysqldump –u[user name] –p[password] –all-databases > [dump file]

Example:
mysqldump –-user root –-p –all-databases > db_codingcluster.sql

How to restoring MySQL database?
 To restore the database from the dump file that you can use the following mysql command.
 mysql -u [username] -password=[password] [database name] < [dump file name]

Example:
mysqldump –uroot –p db_codingcluster < codingcluster.sql


Please share this post if it's useful to you. Thanks!.

Adding Line Breaks into Text Area using JavaScript

Monday

Textarea - output not showing linebreaks:
        Whitespace in HTML output, including many white-space characters in a row,is displayed in HTML pages as a single  ordinary space. And a line break also considered as whitespace.
If you want to display text that includes linebreaks in HTML so that the linebreaks show, you can do the following ways
  •  Put the text in between <pre> and </pre> tags.
  • (Use your server/client side language to convert the line breaks into <br /> tags.

For example,
Adding Line Breaks into Text Area using JavaScript:

var strAddress= document.forms[0].txt.value;
text = strAddress.replace(/\n\r?/g, '<br />');

Adding Line Breaks into Text Area using PHP:

$strAddress = str_replace("<br>", "\n", $strAddress);


Please share this post if it's useful to you. Thanks!.

How to auto focus (auto tab) to next uitextfield in iPhone?

TabIndex changed automatically  on UITextField - iPhone:
                                                                                            That means if you  finished typing first character, the focus should move to the next text field without pressing other key or pressing tab key. For example your password field may need focus on next UITextfield automatically. In my password page each textfield contains one letter, when I type one letter and after that the focus moved to next textfield automatically by using this code snippets .
This is a sample code for AutoFocus to nextUITextField on iphone.
 
 - (BOOL)textField:(UITextField *)textField shouldChangeCharactersInRange:(NSRange)range replacementString:(NSString *)string
{       
    NSString *strPassword = [textField.text stringByReplacingCharactersInRange:range withString:string];
    if( [strPassword length] > 0 ){
        textField.text = string;       
        UIResponder* nextResponder = [textField.superview viewWithTag:(textField.tag + 1)];
        if (nextResponder) {
            [nextResponder becomeFirstResponder];
        }       
        return NO;
    }   
    return YES;
}

Note: Don't forget to add Tag for your UITextFiels, before run this code.

Add image to UITableviewCell without custom cell - iPhone

Saturday

iphone - add image to UITableViewCell:
                                                             In one of my iphone app I need to display UITableView with image. The table view should look like  Image Label Disclosure so I'm using a  custom table view cell for this structure and I did it. Lately I got one solution from net to display images in UITableView without any extra custom cell view files. That means there is no custom UITableViewCell used to add an image to the left side of the cell.
            Simply configure the imageView property of the UITableView cell in your tableView:cellForRowAtIndexPath: delegate method.

Code:
- (UITableViewCell *)tableView:(UITableView *)tableView cellForRowAtIndexPath:(NSIndexPath *)indexPath
{
    UITableViewCell *cell = [tableView dequeueReusableCellWithIdentifier:@"MyIdentifier"];
    
    if (cell == nil) {
        
        cell = [[UITableViewCell alloc] initWithStyle:UITableViewCellStyleSubtitle reuseIdentifier:@"MyIdentifier"];        
        cell.selectionStyle = UITableViewCellSelectionStyleNone;
        
        cell = [[[UITableViewCell alloc] initWithFrame:CGRectZero] autorelease];
        UIButton *myAccessoryButton = [[UIButton alloc] initWithFrame:CGRectMake(0, 0, 24, 24)];
        [myAccessoryButton setBackgroundColor:[UIColor clearColor]];
        [myAccessoryButton setImage:[UIImage imageNamed:@"arrow_right_orange.png"] forState:UIControlStateNormal];
        [cell setAccessoryView:myAccessoryButton];
        [myAccessoryButton release];
        
    }
    cell.textLabel.font = [UIFont systemFontOfSize:12];
    NSString *imageName = [imagesList objectAtIndex:indexPath.row];
    cell.imageView.image = [UIImage imageNamed:imageName];
    cell.textLabel.text = [arry objectAtIndex:indexPath.row];
    
    return cell;
}


         In the above screen shot, the image name and labels are declared as array in ViewDidLoad. In the screen shot I've changed the UInavigationbar background color. and also I've added Custom-Colored Disclosure Indicators(in Orange).

How to add custom colored  Disclosure button on  UITableViewCell - iPhone:
        This is a sample code for add custom colored  disclosure button UITableViewCell. Add the follwing code  cell in your tableView:cellForRowAtIndexPath: delegate method and replace the disclosure image(arrow_right_orange.png).

 if (cell == nil) {
        
        cell = [[UITableViewCell alloc] initWithStyle:UITableViewCellStyleSubtitle reuseIdentifier:@"MyIdentifier"];        
        cell.selectionStyle = UITableViewCellSelectionStyleNone;
        
        cell = [[[UITableViewCell alloc] initWithFrame:CGRectZero] autorelease];
        UIButton *myAccessoryButton = [[UIButton alloc] initWithFrame:CGRectMake(0, 0, 24, 24)];
        [myAccessoryButton setBackgroundColor:[UIColor clearColor]];
        [myAccessoryButton setImage:[UIImage imageNamed:@"arrow_right_orange.png"] forState:UIControlStateNormal];
        [cell setAccessoryView:myAccessoryButton];
        [myAccessoryButton release];
        
    }
 If this post is useful for you , please share this knowledge to your friends. Thanks!

How to merge conflicts project.pbxproj fille in Xcode - iPhone

Thursday

Merge the Xcode project.pbxproj and commit - iPhone:
                            To merge the .pbxproj file conflicts, simply rename your project extension with .txt instead of .xcodeproj and open the project.pbxproj (It's placed inside the .xcodeproj)with any text editor then search with <<<<< HEAD and  >>>>>, now just delete those merge markers and rename the project with original extension. You can follow the below steps. In this example my project name is myProject.pbxproj and it get conflicts.
  • Rename myProject.xcodeproj into myProject.txt
  • Open project.pbxproj into a text editor and search with <<<<< and  >>>>>
  • Delete those merge markers
  • Then rename myProject.txt into myProject.xcodeproj
Example:
Before merge  project.pbxproj file (your file contain some like this)

                   <<<<<<< HEAD
                CE880AEF14F516FB00948100 /* home.png in Resources */,
                CE880AF014F516FB00948100 /* default.png in Resources */,
=======
>>>>>>> f051c078e66e3970f5a15d851a40298f085e24b6

After merge project.pbxproj file

                CE880AEF14F516FB00948100 /* home.png in Resources */,
                CE880AF014F516FB00948100 /* default.png in Resources */,
 
Git commit project.pbxproj file after merge conflicts  :
                                 After merge conflicts if you get error message like "If this is not correct, please remove the file# .git/MERGE_HEAD" while try to commit your git repository. Don't worry you can easly solve this problem by provide a commit message for the merge operation.

                   git commit -m "Merge conflicts"
                             OR
                   git commit -a  -m "Merge conflicts"


 That's all. If this post is useful for you , please share this knowledge to your friends. Thanks!
  

How to change the UInavigationbar background color without image

Tuesday

UInavigationbar with custom color(Set different colors for both UInavigationbar and UIBarButtonItem):
                                                      The following code which is used to programmatically  set color  for UInavigationbar. Here I'm changed the UInavigationbar color and also button color, without use any images.
Here we can set different colors for both UInavigationbar and UIBarButtonItem.

UInavigationBar Color - Codingcluster
         
Code:
- (void)viewDidLoad
{  
    self.title = @"Coding Cluster"; 
    // use setNavigationBarHidden:animated: if you need animation 
    self.navigationController.navigationBarHidden = NO;
   
     UIBarButtonItem *addButton = [[UIBarButtonItem alloc]
                                  initWithTitle:NSLocalizedString(@"Click Me", @"")
                                  style:UIBarButtonItemStyleDone
                                  target:self
                                  action:@selector(YourActionMethod:)];
   
    self.navigationItem.rightBarButtonItem = addButton;
    UIColor *barColor = [UIColor colorWithRed:136/255.0f green:111/255.0f blue:172/255.0f alpha:1/255.0f];
    UIColor *buttonColor = [UIColor colorWithRed:157/255.0f green:136/255.0f blue:187/255.0f alpha:0.50/255.0f];
    UINavigationBar *bar = [[self navigationController] navigationBar];
    [bar setTintColor:barColor];
    [addButton setTintColor:buttonColor];
      } 

That's all. If this post is useful for you , please share this knowledge to your friends. Thanks!

Back to the Application after end the phone call - iPhone

Friday

Resume your application after call ended - iPhone:
 By using openURL we can make phone call from our app. But it has one disadvantage…rather than bringing the users back to the application, it takes the users to the default Phone application after they end the call. So the user need to reopen the app. To avoid this issue you can use UIWebView to open your tel URL . This is a sample code for resume user to application after phone call ended.

Code

    NSString *strPhoneNo = @"123-345-5678";
    UIWebView *phoneCallWebview = [[UIWebView alloc] init];
    NSURL *callURL = [NSURL URLWithString:[NSString stringWithFormat:@"tel:%@", strPhoneNo]];
    [phoneCallWebview loadRequest:[NSURLRequest requestWithURL:callURL ]];

That's all. If this post is useful for you , please share this knowledge to your friends. Thanks!

Check Password Strength with JavaScript and Regular Expressions

Thursday

Javascript Password Strength Meter:
This post is  good example of a Password Strength checker that uses JavaScript and Regular Expressions. It check the following conditions to create secure password.
  • The password must contains greater than 6 character
  • The password must have both lower and uppercase characters
  • The password must have at least one number
  • The password must have at least one special character
   
PasswordStrength.html

<!DOCTYPE HTML PUBLIC "-//W3C//DTD HTML 4.01 Transitional//EN">
<html>
<head>
  
    <title>Dotnetcluster-Password strength checker</title>
<!-- http://dotnetcluster.blogspot.in -->
    <script language="javascript" type="text/javascript">
 
function pwdStrength(password)
{
        var desc = new Array();
        desc[0] = "Very Weak";
        desc[1] = "Weak";
        desc[2] = "Better";
        desc[3] = "Medium";
        desc[4] = "Strong";
        desc[5] = "Strongest";
        var score   = 0;
        //if password bigger than 6 give 1 point
        if (password.length > 6) score++;
        //if password has both lower and uppercase characters give 1 point      
        if ( ( password.match(/[a-z]/) ) && ( password.match(/[A-Z]/) ) ) score++;
        //if password has at least one number give 1 point
        if (password.match(/\d+/)) score++;
        //if password has at least one special caracther give 1 point
        if ( password.match(/.[!,@,#,$,%,^,&,*,?,_,~,-,(,)]/) ) score++;
        //if password bigger than 12 give another 1 point
        if (password.length > 12) score++;
         document.getElementById("pwdDescription").innerHTML = desc[score];
         document.getElementById("pwdStrength").className = "strength" + score;
}
  
    </script>
</head>
<body>
    <table>
        <tr>
            <td>
          
                    Password<input type="password" name="pass" id="pass" onkeyup="pwdStrength(this.value)" />
            </td>
            <td>
                <div id="pwdDescription" style="color: red"">
                    <b>Password</b>
                </div>
            </td>
        </tr>
       
    </table>
</body>
</html>
 Demo for check password strength:

Password
Password
That's all. If this post is useful for you , please share this to your friends. Thanks!

Auto move (Auto Tab)cursor onto next form field using Javascript

Auto Tab Form Fields using JavaScript:
                   This a simple sample code for auto tab form fields using javascript.  It works in conjunction with the "maxlength" attribute of HTML, triggered whenever the user's input reaches the maxlength's value.
Code:

<script type="text/javascript">
/*
Auto tabbing script http://codingcluster.blogspot.in/
*/
function autoTab(current,next){
if (current.getAttribute&&current.value.length==current.getAttribute("maxlength"))
next.focus()
}

</script>

<b>Enter your input:</b>
<form name="fromAutoTab">
<input type="text" name="first" size="4" onkeyup="autoTab(this, document.fromAutoTab.second)"
    maxlength="3" />
<input type="text" name="second" size="4" onkeyup="autoTab(this, document.fromAutoTab.third)"
    maxlength="3" />
<input type="text" name="third" size="5" maxlength="4" />
</form>
  Try this demo:
  Enter your input:

iPhone -AVAudioplayer playback progress view

AVAudioplayer with progress view - iPhone:
                              This post have  a sample working code for show progress view when the audio is playing by using AVAudioplayer.
 First declare the progress view in to your .h file

IBOutlet UIProgressView *progressAudio;

Next call this progressAudio in to your .m file
@Synthesize progressAudio;
Then add the following in to where the audio start to play

 //For Progress View
    NSTimer * myTimer = [NSTimer scheduledTimerWithTimeInterval:1.0
                                                        target:self
                                                       selector:@selector(updateProgressView)
                                                       userInfo:nil
                                                        repeats:YES];

And finally updateProgressView method,

- (void)updateProgressView{
     
    float totalTime=self.appSoundPlayer.duration;
    float fltTime=self.appSoundPlayer.currentTime / totalTime;
    progressAudio.progress=fltTime;
}

That's all. If this post is useful for you , please share this to your friends. Thanks!

How to generate a random password in php

Wednesday

PHP: Generate a random password:
                            The followinf function will generate a random password. We just give total length of the password as input. For this we will print the function value, specifying the length of the password to be generated.

Code

<?php
<!--  -->
function generateRandomPassword($cnt)
{
// characters to be included for randomization, 
$chars= str_shuffle('abcdefghijklmnopqrstuvwxyzABCDEFGHIJKLMNOPQRSTUVWXYZ1234567890@#%$*');

// Here specify the 2nd parameter as start position, it can be anything, default 0
return substr($chars,0,$cnt);
}
// Usage 
$password = generateRandomPassword(7); // specify the length of the generated password
echo "Your random password is:".$password; 
<!-- --> ?>

How to check username availability using asp.net (c#)-Like Ajax

Tuesday

Check username availability using ajax style in ASP.NET:
                                                Here I'm checking the username availability  with SQL Server 2005. Here you can download  a sample project that explained to check username availability.In this sample I'm checking username using sql server at the onClick event. And also i'm used three images to represent the status of the user name (In-Progress, UserName Already Exists and UserName Available) see the below images. A please wait progress bar running after click the Check Availability button


If the given user name(vasanth) already exists in the database I've displayed the "UserName Already Exists" image.


The given user name(vasanth) already exists in the database, so we have check with some other username (here codingcluster). If the given user name( codingcluster ) not exists in the database I've displayed the "UserName Available" image.


 You can download full code for check username availability using asp.net (c#) here. Just download and create  a virtual directory.(Before, you have create a database by using UserAvailability_SQL.txt)

An error has occurred. Unable to import an item. The contents of an item cannot be retrieved.

Importing Private/public Keys - iPhone:
                                         If you have any problem with import your personal iPhone public and private development key into the keychain via a double-click, don’t worry! just try the following method to importing Private/public Keys

         Just start the Terminal.app and use the following commands to manually import both keys. Please replace  Private _key.p12 and Public_key.pem with your personal key files. That’s it!
1) security import Private_key.p12 -k ~/Library/Keychains/login.keychain
2) security import Public_key.pem -k ~/Library/Keychains/login.keychain

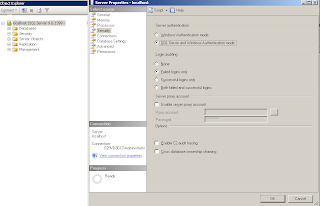
Login failed for user ‘sa’. The user is not associated with a trusted SQL Server connection.(Microsoft SQL Server error: 18456):

Login failed for user 'sa' sql server 2005 :(Microsoft SQL Server error: 18456)
                        Normally if the  SQL Server is not set to use both SQL Server and Windows Authentication Mode, this error will occurred. To fix this issue you have to change the Authentication Mode of the SQL server from “Windows Authentication Mode (Windows Authentication)” to “Mixed Mode (Windows Authentication and SQL Server Authentication)”.


Solution:

  1.      Go to Start > Programs > Microsoft SQL Server 2005 > SQL Server Management Studio.
  2.      Right-click the Server name. Select Properties > Security.
  3.      Under Server Authentication, select SQL Server and Windows Authentication Mode   (refer the   screenshot below)
  4.     The server must be stopped and re-started before this will take effect.


How to get last inserted Identity value in SQL server - ASP.NET

Thursday

Getting the Identity of the last Inserted row - ASP.net/C#:
                                    The key to @@Identity is that it returns the value of an autoincrement column that is generated on the same connection.
           The Connection object used for the Insert query must be re-used without closing it and opening it up again. Access doesn't support batch statements, so each must be run separately. It is also therefore possible, though not necessary, to create a new Command object to run the Select @@Identity query. The following code shows this in action where the Connection object is opened, then the first query is executed against cmd using ExecuteNonQuery() to perfom the Insert, followed by changing the CommandText property of cmd to "Select @@Identity" and running that.
Code:

protected void btnSave_Click(object sender, EventArgs e)
    {
        string strConnection = ConfigurationManager.ConnectionStrings["myConnectionString"].ConnectionString;
        SqlConnection sqlConn = default(SqlConnection);
        SqlCommand sqlCmd = default(SqlCommand);
        try
        {
            string query2 = "Select @@Identity";
            sqlConn = new SqlConnection(strConnection);
            sqlCmd = new SqlCommand("INSERT into student (firstname, lastname, street, city, state) VALUES ('" + txtFirstname.Text + "', '" + txtLastname.Text + "', '" + txtStreet.Text + "','" + txtCity.Text + "','" + txtState.Text + "')", sqlConn);
            sqlConn.Open();
            sqlCmd.ExecuteNonQuery();
            sqlCmd.CommandText = query2;
            int idx = Convert.ToInt32(sqlCmd.ExecuteScalar());
            if (idx != 0)
            {
                Response.Write("<script>alert('Successfully saved')</script>");
            }
            else
                Response.Write("<script>alert('Not saved')</script>");
        }
        catch (Exception ex)
        {
            Response.Write(ex.ToString() + "<br>");
        }
        finally
        {
            sqlConn.Close();
        }
    }
Please share this post if it's useful to you. Thanks!.

How to Saving/Retrieving Data using- NSUserDefaults :iPhone ( like a session)

Wednesday

Save and retrieve data by using NSUserDefaults - iPhone:
We can save and retrieve different types of data using the NSUserDefaults object.  Saving this way is great for when you want to save small amounts of data such as userName,IDs,Date,Time and program state. You can call NSUserDefaults from anywhere in your app.

Simply it's work like  a session in iphone.

Saving different types of data using the NSUserDefaults in iphone

NSUserDefaults *userDefault = [NSUserDefaults standardUserDefaults];

// saving an NSString value
[userDefault setObject:@"YourTextHere" forKey:@"key_String_Identifier"];

// saving an NSInteger value
[userDefault setInteger:99 forKey:@"Key_Integer_Identifier"];

// saving a Double value
[userDefault setDouble:10.8 forKey:@"Key_double_Identifier"];

// saving a Float value
[userDefault setFloat:1.99 forKey:@"Key_float_Identifier"];

//Don't forget to synchronize the data you set after you're done.
[userDefault synchronize];

Retrieving data using the NSUserDefaults in iphone

NSUserDefaults *userDefault = [NSUserDefaults standardUserDefaults];

// getting an NSString value
NSString *udString = [userDefault stringForKey:@"key_String_Identifier"];
//and you get, udString = YourTextHere;

// getting an NSInteger value
NSInteger udInt = [userDefault integerForKey:@"Key_Integer_Identifier"];
//and you get, udInt  = 99;

// getting an Double value
double udDouble = [userDefault doubleForKey:@"Key_double_Identifier"];
//and you get, udDouble = 10.8;

// getting an Float value
float udFloat = [userDefault floatForKey:@"Key_float_Identifier"];
//and you get, udFloat  = 1.99;


RECENT POSTS

Boost

 
Blogger Widgets