Coding Cluster - using asp.net, c#, mvc 4, iphone, php, ios, javascript, in asp.net mvc 3 & more
 
Showing posts with label Xcode. Show all posts

iphone - create .ipa file in Xcode 4.3

Saturday

How to create .ipa file for your iPhone app : xcode build and archive:
                                                                                     In this article I'm going to explain how to create .ipa file in Xcode 4.3 for your iPhone apps?. Each .ipa file is compressed with a binary for the ARM architecture that can only be installed on iOS devices. If you change the extension to .zip you will be able to unzip it and view the contents.

What is .ipa file (iOS App Store Package file)?
             An .ipa file is an iPhone application archive file which stores an iPhone app. It is usually encrypted with Apple's FairPlay DRM technology. Each .ipa file is compressed with a binary for the ARM architecture and can only be installed on an iPhone, iPod Touch, or iPad. Files with the .ipa extension can be uncompressed by changing the extension to .zip and unzipping.
            .ipa files cannot be installed on the iPhone Simulator because they do not contain a binary for the x86 architecture. To run applications on the simulator, original project files which can be opened using the Xcode SDK are required.

How to create IPA file ? - iPhone:
                         To create .ipa file in your xcode, you can  follow the steps below . Before going to create .ipa file you must build your iPhone app without any errors.

Step 1:  After build your iphone app click Archive option under product menu. ( Note: The Archive option become enable, once you connect your iPhone  with your system)


Step 2:  Then open organizer and  choose your project (from the left panel) under Archives window then click Distribute.


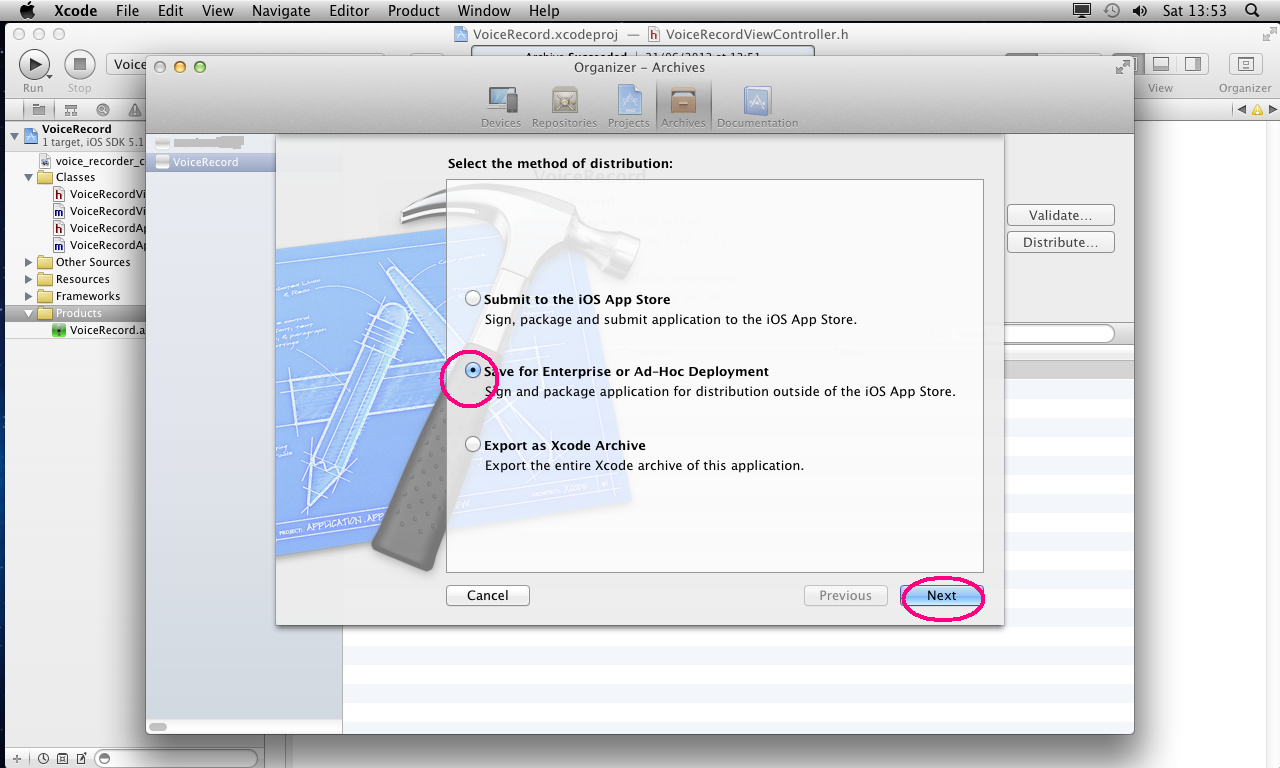
Step 3:  Click Distribute and select  "Save for Enterprise or Ad-Hoc Deployment" option under select the method of distribution. Then click next button.


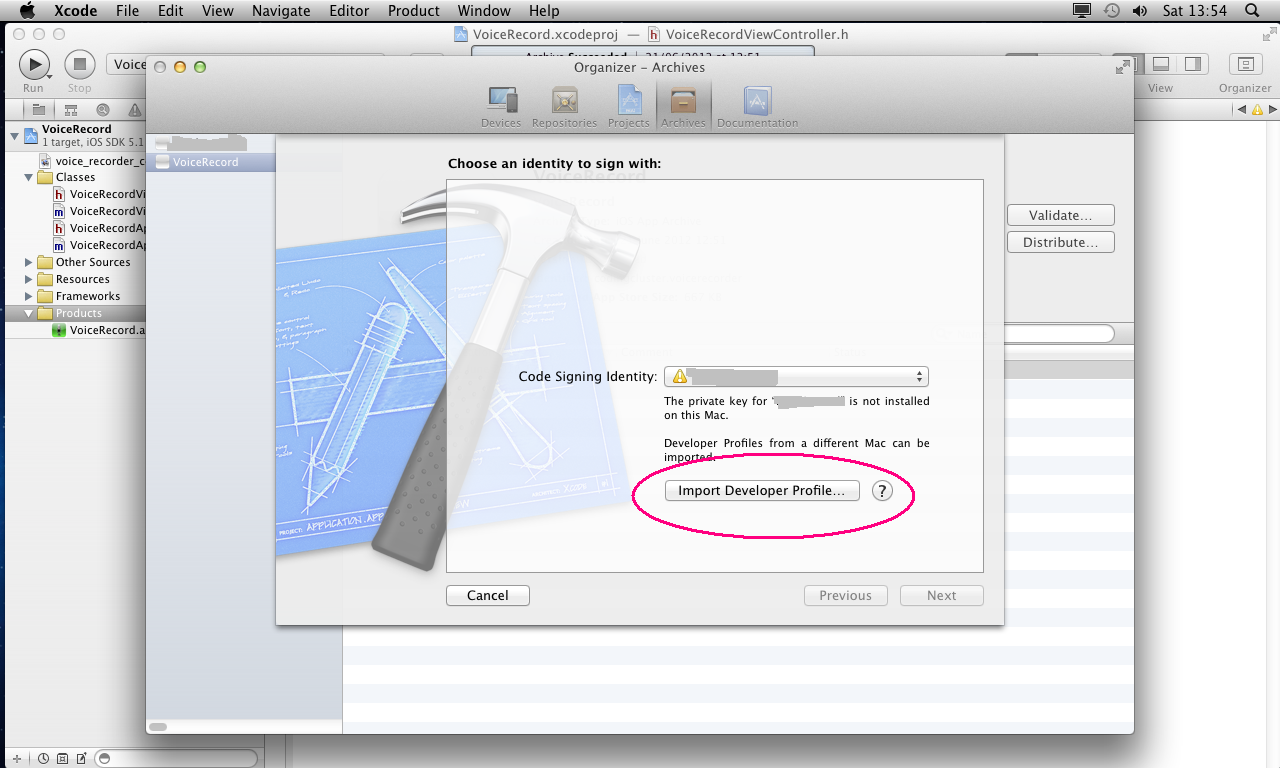
Step 4:  After select distribution method you have to add your iphone developer profile certificate  . Here you can use your existing profile or you can import  a new developer profile.


Step 5:  After complete your code signing identity click next button then  the .ipa file is automatically created and you can save it in your system.


Now your app ready to install to your IOS based devices.

If this post was help to you. Then Share this to your friends. Thanks!

Solution-iphone - UIImagePickerController memory warning("Received memory warning")

Friday

Iphone crash report - Low Memory Warning:  while using UIImagePickerController :
                                                                                              In one of my Iphone project I've  a UIImagePickerController as a synthesized property of my view controller. In general it works fine  for taking/picking photos.  If  I choose/take photos continuously  then I received a memory warning and  the UIImageView become empty(without image).  Some times the app was automatically closed.  I have tried to setting self.imageView.image = nil in viewDidUnload but I got the same "Received memory warning" message. Finally I got the following solution from web.
                   The  solution for UIImagePickerController memory warning is the imagePicker/imageView  wasn't being set to nil in viewDidUnload, but  it needed to remove/dismiss it in didReceiveMemoryWarning method.


Issue:

Solution:
-(void)didreceivememorywarning {
// Release anything that's not essential, such as cached data (meaning //instance variables, and what else...?)

self.imageView.image = nil;

// Releases the view if it doesn't have a superview
[super didReceiveMemoryWarning];

}


iPhone:Create a unique identifier (UUID) for ios using CFUUIDCreate

 How to Create Unique identifier for an iPhone app:
                                                                      The UIDevice uniqueIdentifier property is deprecated in iOS 5 and above and it raise the following questions in our mind.

How to create a GUID/UUID using the iPhone SDK?

iOS 5 deprecates UDID as identifier for developers - What To Do Now?  


                                            The answer is simple and same for all above questions. That is, we can create UUID by our own code to solve this problems. Call the CFUUIDCreate function to create a UUID.
Because,

[[UIDevice currentDevice] uniqueIdentifier];

   used to returns the Unique ID of our iPhone. This is now deprecated and apps are being rejected from the App Store for using it. Create UUID is now the preferred approach.

                       The UUID created by CFUUIDCreate is unique if a user uninstalls and re-installs the app, you will get a new one each time. It means the newly created UUID doesn't change until you delete the app. If you delete the app the UUID also gone and get new one when you re-install the app (It will not change while close and re-open the apps).

Create a UUID, and write it to the defaults database using the NSUserDefaults class:
                      To create a unique identifier specific to your app, you can call the CFUUIDCreate function to create a UUID, and write it to the defaults database using the NSUserDefaults class.

Here is a code for create UUID,

// Create unique identifier for this app(UUID) by using CFUUIDCreate and stored into the NSUserDefaults

- (NSString *)createUUID { 
    
    NSString *uIdentifier = [[NSUserDefaults standardUserDefaults] objectForKey:@"Unique identifier for myApp"];
 
    if (!uIdentifier) {
        
        CFUUIDRef uuidRef = CFUUIDCreate(NULL);
        
        CFStringRef uuidStringRef = CFUUIDCreateString(NULL, uuidRef);
        
        CFRelease(uuidRef);
        
        uIdentifier = [NSString stringWithString:(NSString *)uuidStringRef];
        
        CFRelease(uuidStringRef);
        
        [[NSUserDefaults standardUserDefaults] setObject:uIdentifier forKey:@"Unique identifier for myApp"];
        
        [[NSUserDefaults standardUserDefaults] synchronize];
        
    }
    
    return uIdentifier;    
}

And get the UUID,

NSString *myAppUniqueID =[self createUUID]; 


If this post  useful to you :  like codingcluster on face book . Thanks!.

Solution: 'release' is unavailable: not available in automatic reference counting mode - iphone

Saturday

iphone: 'retain , release' is unavailable: not available in automatic reference counting mode:
                                                                              When I working with iphone memory leak related issues in iOS 4 and building projects in XCode 4.2.x,  I've encounter the build error like "'release' is unavailable: not available in automatic reference counting mode". And I got the following solution from the net.
                                                                           The default setting for iOS projects have a build setting named "Objective-C Automatic Reference Counting" set to 'Yes'. Simply set this to 'No' and the reference counting error will go away.(see the image bellow).


You have another one option...

Remove all retain release  autorelease NSAutoReleasePools and retainCount calls, since ARC makes them for you. With the exception of NSAutoReleasePools They have been replaced by @autorelease{}.

The second option has been automated by apple.

iPhone: Xcode Shortcut keys

Thursday

XCode Keyboard Shortcuts - iPhone:
                                     Using shortcut keys are much faster then using mouse.Here is some of the xcode shortcuts.

For Shifting
  • Alt-⌘-Up to alter between .m and .h file

  • ⌘-Shift-D, When you want to open a file or a symbol definition that's in your project or in a framework.

  • ⌘-Shift-E expand the editor view to full height of the window.

  • Alt-⌘-Left / Alt-⌘-Right, Navigate among open files back and forth.

  • Control-comma to show the list of available completions, Control-period to insert the most likely completion, and Control-Slash & Shift-Control-Slash to move between place holder tokens.

  • ⌘-double click on a symbol to see the definition of a symbol.

  • Option-double click on a symbol to see the documentation for that symbol– OR– Right click on any word and select 'Find Selected Text in API Reference' to search the API for that word.

  • Cmd-/ to automatically insert "//" for comments.

  • Ctrl+Left/Right Arrow to do intra-word text navigation.

  • Control-1 list down all the project files.

  • Control-2 to access the popup list of functions/methods/symbols in this file.

  • Control-3 list down all the include files

  • Right click on a variable in your function and click edit all in scope.

  • ⌘-[ and ⌘-] to indent and unindent selected text. Makes cleaning up source code much easier.

  • Control-Shift-R to show the Console

  • Control-Alt-⌘-R to clear the log

  • Control-⌘ Left/Right to fold and unfold the function.

  • Shift-⌘-C, the class browser in Xcode.

  • ⌘-=, Jump to the next error in the list of build errors. Display the multiple Find panel with ⌘-Shift-F.

  • ⌘-O, Jump to the Project tab, to the build tab with ⌘-Shift-B and to the debug tab with ⌘-Shift-Y.

iphone apps development requirements

Minimum requirements for iphone app development:

These are all the things you know before you start developing iPhone applications:

  •  You need a Intel based mac os x( Mac mini, Mac book, Mac pro, Mac OS Lion like this..) (or) I'm Installed Mac on windows using VMware

  •  To submit your work to apple you need a apple developer license as well.

  •  Xcode (free download)

  •  The SDK is free to download, so you can build you application and test it on simulator without any cost. But if you want to test it on your iPhone/iPod touch or submit it to apple store, you must have a developer license.

  •  To test your application, you must have either iPod or iPhone because Simulator and device behaves differently on some features like memory.  So I highly recommend you to buy one device as well.

  •  Programming language is Objective – C and its very similar to C/C++.

iphone - Resize UIImage without change aspect ratio

Monday

iPhone Resizing a UIImage:
  This is the sample code for resize an image without change it's original aspect ratio.

Copy and  paste the following code into your .h file

// Change image size without change image ratio
-(UIImage *)scaleImage:(UIImage *)image toSize:(CGSize)newSize;


This is the method for resize the image, copy and  paste the following code into your .m file
-(UIImage *)scaleImage:(UIImage *)image toSize:(CGSize)newSize { 
   
    float width = newSize.width;
    float height = newSize.height;
   
    UIGraphicsBeginImageContext(newSize);
    CGRect rect = CGRectMake(0, 0, width, height);
   
    float widthRatio = image.size.width / width;
    float heightRatio = image.size.height / height;
    float divisor = widthRatio > heightRatio ? widthRatio : heightRatio;
   
    width = image.size.width / divisor;
    height = image.size.height / divisor;
   
    rect.size.width  = width;
    rect.size.height = height;
   
    if(height < width)
        rect.origin.y = height / 3;
    [image drawInRect: rect];
   
    UIImage *smallImage = UIGraphicsGetImageFromCurrentImageContext();
    UIGraphicsEndImageContext();  
   
    return smallImage;
   
}

And finally this is the method to call image resize function.

  UIImage *imageCC= [UIImage imageNamed:@"codingcluster.png"];      
  // Pass your image size as paramater
   UIImage *buttonBk = [self scaleImage:imageCC toSize:CGSizeMake(40.0,40.0)];

Solution - Warning: The Copy Bundle Resources build phase contains this target's Info.plist file

Wednesday

iPhone Info.plist Warning - Solution:
                                             "WARNING: The Copy Bundle Resources build phase contains this target's Info.plist file 'Info.plist'."
 You are getting this warning because you probably added your Info.plist file to your Copy Bundle Resources build phase as shown in Figure


The INFOPLIST_FILE build setting specifies the name of the Info.plist associated with your target. When building a target, Xcode reads this build setting and copies the referenced Info.plist into your application bundle. Because Xcode automatically processes the Info.plist, you should not add it to your Copy Bundle Resources build phase or make it a target member.

To resolve this warning, select your Info.plist from the Copy Bundle Resource build phase as shown in Figure.

Source : https://developer.apple.com/library/ios/#qa/qa2009/qa1649.html


Solution - 'fileAttributesAtPath:traverseLink:' is deprecated - in iPhone SDK

iPhone - Resolve fileAttributesAtPath warning:
                                                       In one of my app I got a warning like " 'fileAttributesAtPath: traverseLink: ' is deprecated " from this line  "NSDictionary* attr = [[NSFileManager defaultManager] fileAttributesAtPath:file traverseLink:YES];". To fixe this issue use Use attributesOfItemAtPath:error: instead. That is...

 Solution:
 NSError* error;
 NSDictionary* attr = [[NSFileManager defaultManager] attributesOfItemAtPath:file error:&error];

I'm fixed my issue by this way.

Solution - Code Sign error: The identity 'iPhone Developer: XXXX' doesn't match any identity in any profile

Monday

Xcode: iPhone app code sign error -Solution:
                                                       "Code Sign error: The identity 'iPhone Developer: xxx' doesn't match any identity in any profile" I'm got this error while try to run my app into iPhone real devices. The reason for this error is,  we need to create or change(if the provisioning profiles exists) in the code design identity.
                                                  To  create new provisioning profiles based on your new certificate.Log on to developer.apple.com and go to the iOS Provisioning Portal -> Provisioning -> Development. Most likely, the profile you once created has expired, so just renew and redownload it.
To change the code design Identity...

1) Go to your app TARGET -> Build Settings

2) Then expand the Code Signing and Code Signing Identity

3) set the Any iOS SDK under Debug as iPhone Developer

4) set the Any iOS SDK under Release as iPhone Developer  (refer the screen shot)


I'm  resolved my problem by this way...

iPhone - Memory leak issues and solution

Saturday

Incorrect decrement of the reference count of an object that is not owned at this point by the caller:
                                                                                                               If you're try releasing an object returned from a property getter method, which in many cases would be the indication of a possible bug. To resolve this problem you can "release" the following way,
    
            [date release];
            date= nil;


               (OR)

   [date release], date= nil;

Argument in message expression is an uninitialized value:
              If you declare any variable without default value this error could be occur. To resolve this issue just you add a default value for your variable.
You can declared like...

       NSString *name = nil;
       NSString *date = nil;


Instead of

      NSString *name;
      NSString *date;


Receiver in message expression is an uninitialized value:
                                                                     You should initialize the value to nil when declaring it.

       personDetails *personInfo = nil;
Instead of
      personDetails *personInfo;


Logic error “Undefined or garbage value returned to caller:
                                                                 Assign default value of your string to nil; where you declared it.
NSString *title; should be changed as  NSString *title = nil;

Solution: How to format the code in xcode

Wednesday

Xcode source code formatting:
                                                There isn't really an code format option in Xcode.
There is an option to re-indent the code, which will re-align the code according to the tab width set in your preferences, but that's about as far as it goes. If you want more than just indentation Xcode does not yet offer built in code formatting but you can use external tools like Uncrustify to apply a consistent code style.


Install code format tool in Xcode(Uncrustify Installation):

  • "cd" to the directory containing the package's source code and type "./configure" to configure the package for your system.
  •  Type `make' to compile the package.
  •   Optionally, type `make check' to run any self-tests that come with the package.
  •   Type `make install' to install the programs and any data files and documentation.
  •  You can remove the program binaries and object files from the source code directory by typing `make clean'.
For more installation details read this .

Please share this post if it's useful to you. Thanks!.


RECENT POSTS

Boost

 
Blogger Widgets